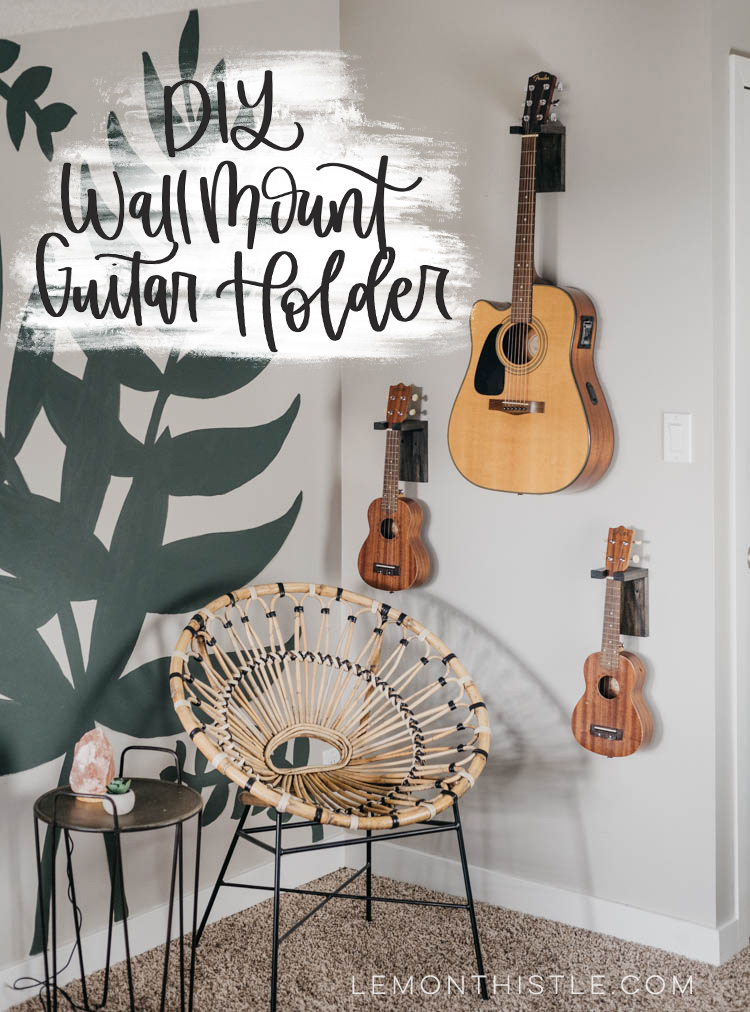
This modern DIY wall mount guitar holder is perfect for displaying your guitars without taking up floor space. Simple design means they look rad even if theres no guitar hung.
Wall mounts for guitars have been on my list to build or buy for years, you guys. I’m so excited to cross those off the mental list and that we get to enjoy this display in our play room. And I’m excited to no longer trip on those ukuleles in the middle of the night. I’m also excited to have Shane’s guitar out so he can pick it up and play more. One of my favourite things we do as a family is sitting around while he plays for us- the kids love to each take a turn and it’s honestly the best. But when it goes away in a case and tucked in a closet- those moments don’t happen as often.

And the ukuleles? We have no clue how to play them. For the twins first birthday, we ordered the twins each a ukulele (Emmitt loved playing with their cousins’) and they’ve been a favourite since but they’ve never had a home- somewhere to put them away. Because they’re bigger than most toys and kind of awkward. So they end up on the hearth or on a dresser or… well, on the floor. But now? On the wall! Heck yes!
To bring you this simple DIY, I’m excited to be partnering again with Kreg Tools. For this project I used their Kreg Jig K4 to attach the two pieces of wood using pocket holes. I’m obsessed with how these turned out and don’t know why I didn’t make them sooner. Ready for the DIY?


SUPPLIES FOR DIY WALL MOUNT GUITAR HOLDERS:
- 1×4 board (12″ per holder, I used maple)
- Miter Saw
- Jigsaw or Scroll Saw
- Drill
- Kreg Jig
- 1 1/4″ Kreg screws
- Fine grit sandpaper
- Ebony Stain
- Satin Poly
- 2 Black Screws (2″ or so)


First, cut your wood to size. The wall mounted piece is 5 1/2″ long and piece that holds the guitar is 4 1/2″. When those are cut, go ahead and add your pocket holes in using your Kreg Jig. Remember to adjust your stopper on the drill bit to your depth of wood!


Once your pocket holes are drilled, cut the shape for your guitar neck. I used my Dremel Moto Saw which is basically a scroll saw for this, but a jigsaw should work as well! Make sure to measure the neck of your guitar and make the slot for the headstock smaller than the base of the headstock, but larger than the top of the neck. The ‘entrance’ for the guitar holder just needs to be larger than the depth of the neck (turn it sideways). When cutting tight curves like this, make sure to go slow and let the blade do the work- don’t push your wood through or you will damage your blade!


Once it’s cut, test it before attaching the two wood pieces together! When you’re happy with the shape of your guitar holder piece- time to pull out the drill! Screw the two pieces together using the pocket holes you’ve drilled. If you are using a hard wood like maple, you’ll need to use the fine thread pocket hole screws.


Once your pieces are attached, give them a good sanding with fine grit sandpaper. Even if it seems smooth, make sure to sand every surface so the stain absorbs evenly. When this is done, you can stain them and seal them. I used the Minwax Ebony Stain and a clear poly in a satin finish.
Now you can hang them! I just used two longer black screws to mount these to the wall. Make sure to drill a pilot hole first to prevent splitting and screw into the top half of the wall mount.


That’s it, that’s all! They are so great for this space, I’m so happy with how they turned out. Now the guitars and ukuleles are handy to play, out of the way, and double as decor! Do you have guitars or ukuleles kicking around your house you’d love to have up on display?
If you have a Kreg Build Something account, make sure to hop over and save the plans there! Prefer to pin? Check out the image at the bottom of the post!

Image Sources:
- Mural Video Timelapse
- Chair – Article
- Ukuleles (mine are so old I can’t find the sale history, but these look almost identical!)
- Table – Michaels
LIKE IT? PIN IT!

 Outdoor Spring Cleaning Checklist
We have always had a cheapie uke for the kids. Two years ago, all my then 8 year old wanted was a good one for her birthday. It took until this winter to finally get around to starting in home lessons for her. It has been fantastic! Wish we started her earlier. Now we have campfire entertainment!!
Oh I would love my kids to learn! We are thinking of starting them in piano next year :)
I love how you designed this corner. Hanging your guitars looks so clean and modern. Nice!
Thank you Sarah! I’m so happy with how they look up there :)
HI I realy want to make this for my son but I can seem to get the cutout right, is there a template that I couod get somewhere?
Hi Sam, I don’t have a template no! the width of the opening is just larger than the neck of the guitar held sideways, then the back is just larger than the neck is accross, but smaller than the top of the guitar neck (not sure what these pieces are technically called!)